This is a quick tutorial to describe how to create Transparent glass effect in Photoshop from a photo in jpeg.
This was the part of a photograph shoot by me. Here the cup was to be put on other background, so I need to make the cup image transparent.
This is the final layer comp after I have finished. Let me explain the layer structure:
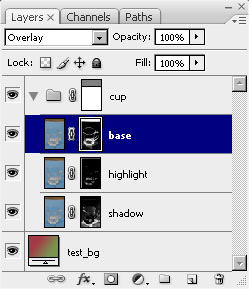
cup : this is a group which contains the base shadow and highlight layers. there is also a vector mask applied on the cup layer group which cuts out the unnecessary portions of the image, which is the table top here. Basically the three layers under cup group are same except from there blend mode and mask.
base : this is the base layer of the final comp. the blend mode of this layer is set to overlay so that it optically merges with underlying layers. The layer mask of this layer is made from selecting the flat background color of the shoot image using select -> color range and adjusting the fuzziness a bit. After properly selecting the background colour I inverted the mask revealing everything except the background. Then I applied smart blur of about 2 px and sharpened the mask a bit.
highlight : this layer contains the highlight portion of the composition. Its blend mode is set to screen, so that it lightens the highlighted parts. Its mask is made from selecting the highlighted parts of the image, basically, the white and bright yellow portion of the image, using select -> color range and adjusting the fuzziness a little. After setting the mask I applied smart blur and smart sharpen to get rid of the unwanted pixilation due to fuzziness.
shadow : this layer contains the shadow of the image. This layers blend mode is set to multiply to darken the underlying image. its mask is made from selecting the darker portions of the image, using select -> color range and adjusting the fuzziness a little. After setting the mask I applied smart blur and smart sharpen to get rid of the unwanted pixilation due to fuzziness. I also included the faint shadow on the ground in my shadow mask, so that original caustic effects can also be there.
test_bg : this is nothing but a gradient layer. This layer is a dummy and is used to test the clarity and transparency of the cup. I like vector layers for their flexibility and edit ability. after completion of the final comp I can play with the color picker of the gradient layer to test whether the cup is perfectly transparent or not.
When they are composited together in Photoshop the final result is a perfectly transparent glass. To decrease the shadow or highlight amount just set the opacity of the corresponding layers down to any value. Also if you want to make the glass more transparent then decrease the opacity of the base layer.
This way you can have full liberty to control the highlight and shadow amount and the overall transparency of the glass.
This was the part of a photograph shoot by me. Here the cup was to be put on other background, so I need to make the cup image transparent.
 |  |
| I used the back cover of an office file as my blue screen and placed the cup over it. | Here is the final result. It was achieved in a few steps within a couple of minutes. |
This is the final layer comp after I have finished. Let me explain the layer structure:
cup : this is a group which contains the base shadow and highlight layers. there is also a vector mask applied on the cup layer group which cuts out the unnecessary portions of the image, which is the table top here. Basically the three layers under cup group are same except from there blend mode and mask.
base : this is the base layer of the final comp. the blend mode of this layer is set to overlay so that it optically merges with underlying layers. The layer mask of this layer is made from selecting the flat background color of the shoot image using select -> color range and adjusting the fuzziness a bit. After properly selecting the background colour I inverted the mask revealing everything except the background. Then I applied smart blur of about 2 px and sharpened the mask a bit.
highlight : this layer contains the highlight portion of the composition. Its blend mode is set to screen, so that it lightens the highlighted parts. Its mask is made from selecting the highlighted parts of the image, basically, the white and bright yellow portion of the image, using select -> color range and adjusting the fuzziness a little. After setting the mask I applied smart blur and smart sharpen to get rid of the unwanted pixilation due to fuzziness.
shadow : this layer contains the shadow of the image. This layers blend mode is set to multiply to darken the underlying image. its mask is made from selecting the darker portions of the image, using select -> color range and adjusting the fuzziness a little. After setting the mask I applied smart blur and smart sharpen to get rid of the unwanted pixilation due to fuzziness. I also included the faint shadow on the ground in my shadow mask, so that original caustic effects can also be there.
test_bg : this is nothing but a gradient layer. This layer is a dummy and is used to test the clarity and transparency of the cup. I like vector layers for their flexibility and edit ability. after completion of the final comp I can play with the color picker of the gradient layer to test whether the cup is perfectly transparent or not.
 |  |  |
| Mask for base | Mask for highlight | Mask for shadow |
 |  |  |
| Composite of base | Composite of highlight | Composite of shadow |
When they are composited together in Photoshop the final result is a perfectly transparent glass. To decrease the shadow or highlight amount just set the opacity of the corresponding layers down to any value. Also if you want to make the glass more transparent then decrease the opacity of the base layer.
This way you can have full liberty to control the highlight and shadow amount and the overall transparency of the glass.
KEYLIGHT 1.2 can be far better sir
ReplyDelete