This is the first part of the 3D packaging presentation tutorial. This section describes how to create the actual packaging design in Illustrator.
This section is also divided into three subsections which are namely
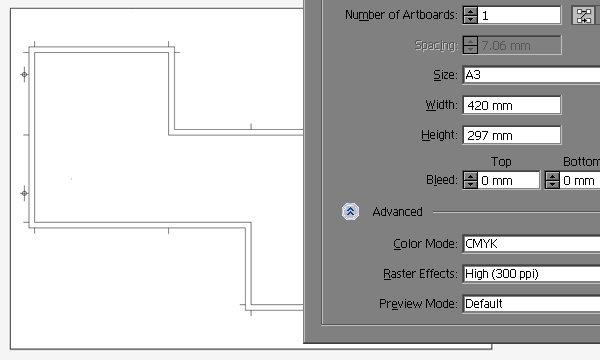
Select an art-board of your choice. I have taken an art-board in A3 as my template is optimized for this size. You can choose between various templates that have been provided with Illustrator.
Optionally set the color mode of this new document as CMYK as our design is for print purpose.

Create a circle which nearly covers the top flap of the package. You don't have to be specific about the dimension. Create several smaller circles of various radius bellow this circle – be sure that they overlaps.
Now select all these circles and unite them from the Pathfinder pallet. The basic shape of the splash is ready.
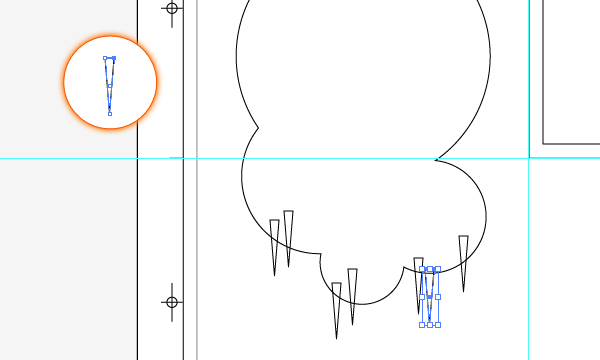
Using pen tool create a triangular shape as shown inset. Make several copies of this shape and spread them randomly under the bottom portion of the splash shape. These are the drips from our splash. Make sure that the spacing and offset of these drip shapes should not be regular at all.
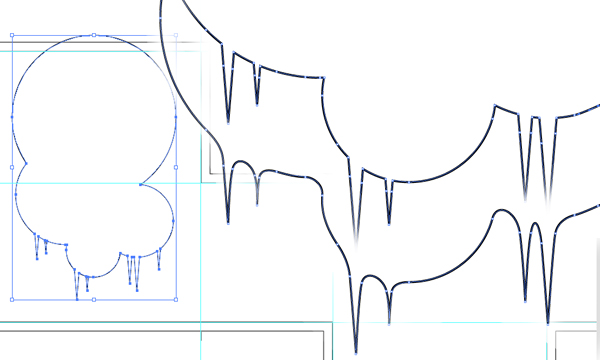
Select all these drips along with the splash shape we had created earlier and click unite from the pathfinder panel to merge them into a single shape. Using pen tool add some extra points on this newly created shape as shown in the image later delete the corners to make the shape 'loose'. You will have to adjust the tangents of the new paths a bit to get the proper shape.
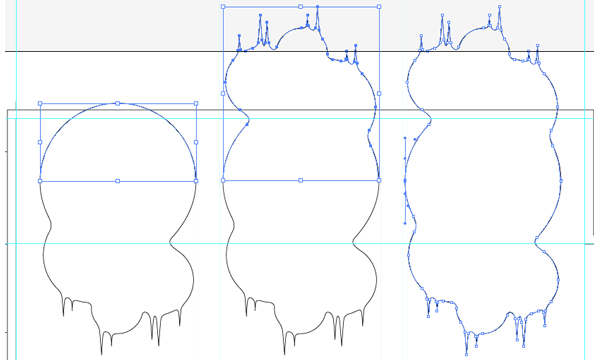
Using direct selection tool select the two nodes from left and right from the original big circle and click on 'cut path at selected anchor points' tool from the 'object panel'. After this the shape is been split into two different paths – you don't need the top part of the splash – so delete it.
Make a copy of the rest and rotate it 180 degrees and adjust its placement so that the two end points of these two shapes coincide.
Select the overlapping end points of these two paths and click object – path – join to join them separately to merge them to a single shape.
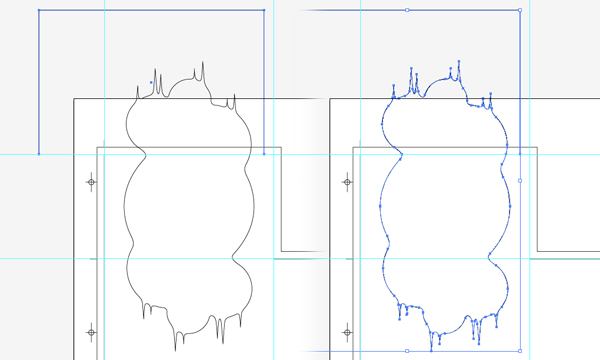
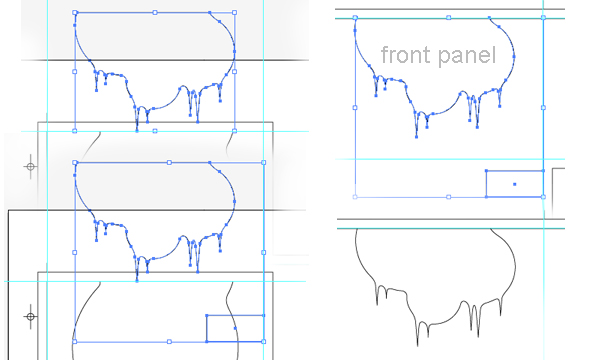
So this is our 'continuous' shape. It is flowing from top panel to back panel of the package - now we need to shift the top portion to the front panel.
Draw a large rectangle touching the top most key-line and covering the top portion of the graphics. Select the rectangle along with the splash graphics and on the pathfinder panel press 'divide'. This will separate the top portion. Ungroup the selection and delete the unnecessary by product of the rectangle.
Now select the top shape and rotate it 180 degrees in place. We know that this will be aligned with the top key-line of the front panel, but for horizontal adjustment let's add a dummy rectangle aligned with right key-line of the top and back panel. Then selecting both the top shape and the rectangle – drag them to align in front panel.
When it is properly placed – delete the dummy rectangle.
Our splash graphics is ready and placed properly on the back, top and front panels. It is time to prepare the background.
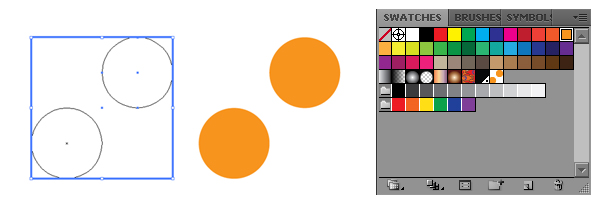
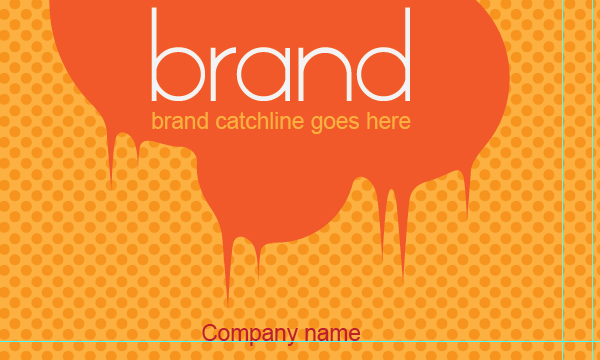
Using the ellipse too create a circle of 16px diameter and make a copy of it. Now select the rectangle tool and create a square of 32px. Delete stroke and fill of the square and fill the two circles with c=0 m=50 y=100 k=0.
Now align the circles to the bottom-left and top-right with respect to the square. You may need to go to wire-frame preview as you can't see the square. When you are finished – select the circles together and drag them to the swatches panel to create a pattern fill.
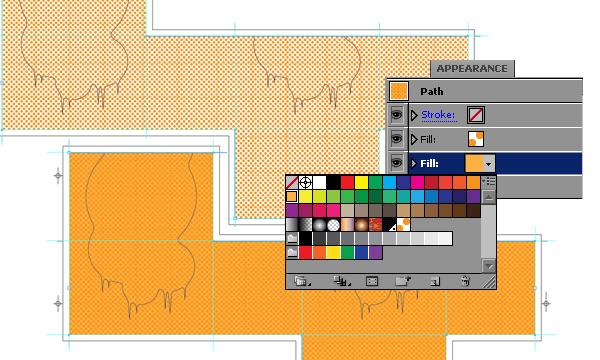
Now select the background shape of the packaging design and from the 'appearance' panel select the two-dot symbol to fill it with the repeated dot shapes. Next add another fill from the 'appearance' panel for the background shape and create a solid fill with color c=0 m=35 y=85 k=0. make sure that the solid fill stays below the dotted fill for the right appearance.
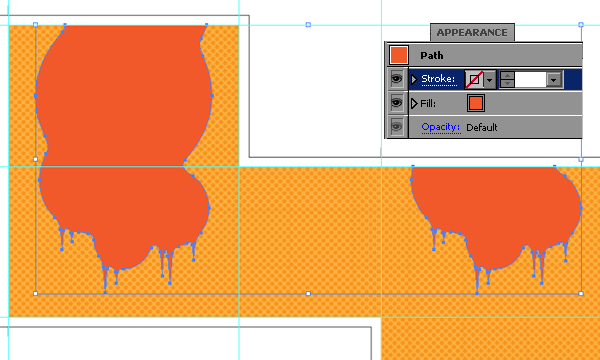
Select the two splashes shapes and fill them with c=0 m=80 y=95 k=0
It's time to create the text placeholders – we want to leave padding of 16px for these shapes, so create guides accordingly.
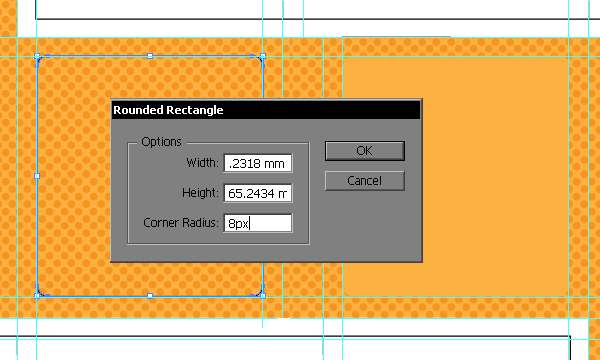
Create rounded rectangle with 8px corner radius inside the guides on left panel of the design and fill with c=0 m=35 y=85 k=0.
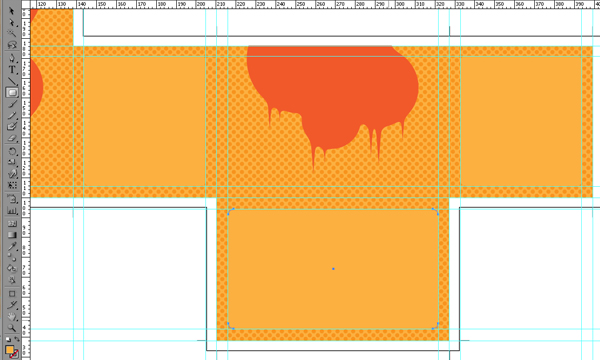
Copy the rectangle two times – one for the right panel and another for the bottom panel.
The dimension of the text placeholder on the right panel is same like that of the ;eft so we don't need to alter it – but for the bottom panel it is different. So align it with the guides on top-left of the bottom panel and then using the direct selection tool drag the nodes on the right and the bottom portion of the rectangle to place it properly. As this shape is a rounded rectangle – so you can not scale it directly so as to maintain the corner radius.
As our background graphics and atrtwork is prepared it is time to place text on the design. The specification of texts I have used in my design is as follows:
Make them all center aligned
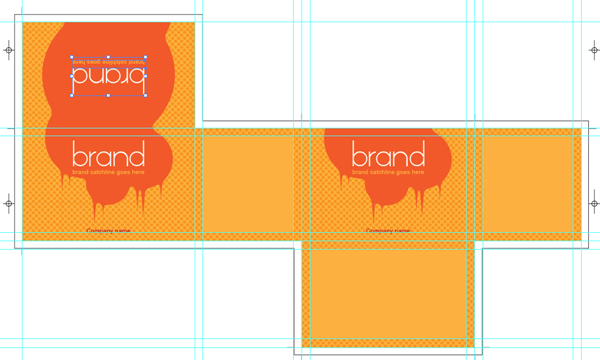
Once our brand has been 'established' – copy it to two more places – on the back panel and on the top panel. You will need to rotate the brand text on the top panel by 180 degrees so that when it will be folded in box the brand text will face to the user.
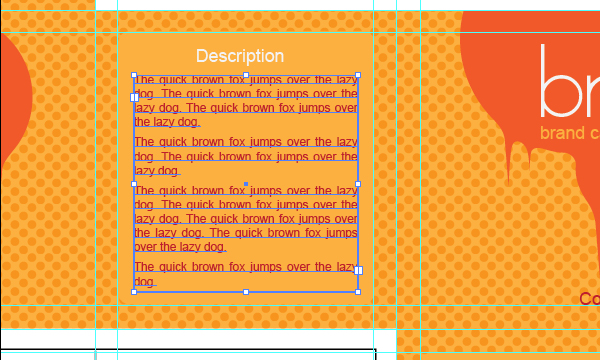
On the text placeholder on left panel, create two more text blocks. Top one is a point text for the heading and bottom one is for the actual description paragraph. The spec of these text blocks for my design is as follows :
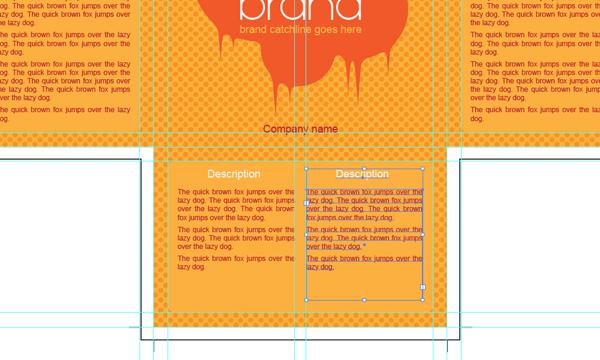
Now copy these two text blocks to right and bottom panel. Right panel text doesn't need any alteration, but the bottom panel text has been split into two columns leaving a 16px gap between them.

After placing the texts in the bottom panel we will modify them a bit, on the left column address line is added and on the right column necessary product details like net weight, max. retail price, barcode etc. have been included. I have also added a dummy logo here for balance.
The specification of the bigger body text for net weight and mrp is like this:
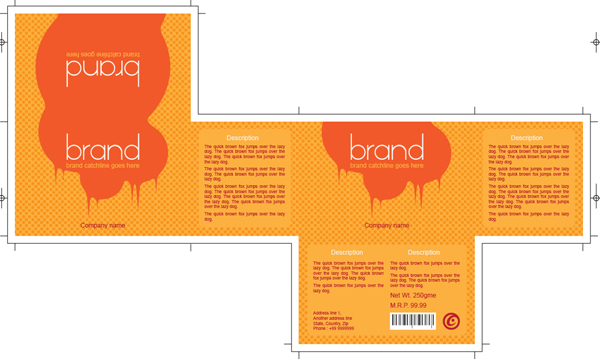
So this is the whole thing we have created this far – export a jpeg of this design 120 dpi or more.
Next : mockup in Blender
Part 1 : Design in illustrator
This section is also divided into three subsections which are namely
- Prepare graphics
- Creating a background
- Adding texts
Select an art-board of your choice. I have taken an art-board in A3 as my template is optimized for this size. You can choose between various templates that have been provided with Illustrator.
Optionally set the color mode of this new document as CMYK as our design is for print purpose.
Prepare graphics
In this part you will see how to create a 'seamless' graphics which is 'flowing' from front to back side of the package.Create a circle which nearly covers the top flap of the package. You don't have to be specific about the dimension. Create several smaller circles of various radius bellow this circle – be sure that they overlaps.
Now select all these circles and unite them from the Pathfinder pallet. The basic shape of the splash is ready.
Using pen tool create a triangular shape as shown inset. Make several copies of this shape and spread them randomly under the bottom portion of the splash shape. These are the drips from our splash. Make sure that the spacing and offset of these drip shapes should not be regular at all.
Select all these drips along with the splash shape we had created earlier and click unite from the pathfinder panel to merge them into a single shape. Using pen tool add some extra points on this newly created shape as shown in the image later delete the corners to make the shape 'loose'. You will have to adjust the tangents of the new paths a bit to get the proper shape.
Using direct selection tool select the two nodes from left and right from the original big circle and click on 'cut path at selected anchor points' tool from the 'object panel'. After this the shape is been split into two different paths – you don't need the top part of the splash – so delete it.
Make a copy of the rest and rotate it 180 degrees and adjust its placement so that the two end points of these two shapes coincide.
Select the overlapping end points of these two paths and click object – path – join to join them separately to merge them to a single shape.
So this is our 'continuous' shape. It is flowing from top panel to back panel of the package - now we need to shift the top portion to the front panel.
Draw a large rectangle touching the top most key-line and covering the top portion of the graphics. Select the rectangle along with the splash graphics and on the pathfinder panel press 'divide'. This will separate the top portion. Ungroup the selection and delete the unnecessary by product of the rectangle.
Now select the top shape and rotate it 180 degrees in place. We know that this will be aligned with the top key-line of the front panel, but for horizontal adjustment let's add a dummy rectangle aligned with right key-line of the top and back panel. Then selecting both the top shape and the rectangle – drag them to align in front panel.
When it is properly placed – delete the dummy rectangle.
Our splash graphics is ready and placed properly on the back, top and front panels. It is time to prepare the background.
Creating a Background
Here in this subsection we will create a background for our packaging design.Using the ellipse too create a circle of 16px diameter and make a copy of it. Now select the rectangle tool and create a square of 32px. Delete stroke and fill of the square and fill the two circles with c=0 m=50 y=100 k=0.
Now align the circles to the bottom-left and top-right with respect to the square. You may need to go to wire-frame preview as you can't see the square. When you are finished – select the circles together and drag them to the swatches panel to create a pattern fill.
Now select the background shape of the packaging design and from the 'appearance' panel select the two-dot symbol to fill it with the repeated dot shapes. Next add another fill from the 'appearance' panel for the background shape and create a solid fill with color c=0 m=35 y=85 k=0. make sure that the solid fill stays below the dotted fill for the right appearance.
Select the two splashes shapes and fill them with c=0 m=80 y=95 k=0
It's time to create the text placeholders – we want to leave padding of 16px for these shapes, so create guides accordingly.
Create rounded rectangle with 8px corner radius inside the guides on left panel of the design and fill with c=0 m=35 y=85 k=0.
Copy the rectangle two times – one for the right panel and another for the bottom panel.
The dimension of the text placeholder on the right panel is same like that of the ;eft so we don't need to alter it – but for the bottom panel it is different. So align it with the guides on top-left of the bottom panel and then using the direct selection tool drag the nodes on the right and the bottom portion of the rectangle to place it properly. As this shape is a rounded rectangle – so you can not scale it directly so as to maintain the corner radius.
Adding texts
Here in this section we will add text-blocks, paragraphs and miscellaneous details and description placeholders for the mock-up.As our background graphics and atrtwork is prepared it is time to place text on the design. The specification of texts I have used in my design is as follows:
| color | Font | Font size | |
| Brand | C=0 m=0 y=0 k=0 | Lt oksana regular | 54pt |
| Catchline | C=0 m=35 y=85 k=0 | Arial | 12pt |
| Company | C=15 m=100 y=90 k=10 | Arial | 12pt |
Once our brand has been 'established' – copy it to two more places – on the back panel and on the top panel. You will need to rotate the brand text on the top panel by 180 degrees so that when it will be folded in box the brand text will face to the user.
On the text placeholder on left panel, create two more text blocks. Top one is a point text for the heading and bottom one is for the actual description paragraph. The spec of these text blocks for my design is as follows :
| color | Font | Font size | Alignment | Paragraph properties | |
| Description | C=0 m=0 y=0 k=0 | Arial | 12pt | Center | |
| text | C=15 m=100 y=90 k=10 | Arial | 8pt | Left-justify | Spacing after para – 4pt. |
Now copy these two text blocks to right and bottom panel. Right panel text doesn't need any alteration, but the bottom panel text has been split into two columns leaving a 16px gap between them.
After placing the texts in the bottom panel we will modify them a bit, on the left column address line is added and on the right column necessary product details like net weight, max. retail price, barcode etc. have been included. I have also added a dummy logo here for balance.
The specification of the bigger body text for net weight and mrp is like this:
| color | Font | Font size | Alignment |
| C=15 m=100 y=90 k=10 | Arial | 16pt | Left |
So this is the whole thing we have created this far – export a jpeg of this design 120 dpi or more.
Next : mockup in Blender
How did you add the crop marks and registration marks?
ReplyDeleteThe crop marks and registration marks are designed - not inserted, I have first placed rectangles for different panels and then extruded the edges for including bleed area, then added the crop marks to the design. same thing is done for registration marks - they are just four-color black lines placed inside bleed area.
ReplyDeleteIf you ever get the chance could you please make a visual explanation? Either way I want to say thank you!
ReplyDeleteSure thing friend, you gave me a nice idea about another packaging related tutorial. Tho I am not a full-time packaging designer, but I have interest in this field and that's why I wrote this series of tutorials.
ReplyDeleteI assure you there will be a tutorial soon on scorpydesign regarding how to design packaging templates, and your query will be resolved in it too.
Thank you very much for your interest in this post - all the best.
thanks a lot. Its a good tutorials.
ReplyDeleteNice info, I am very thankful to you for sharing this important knowledge. This information is helpful for everyone. Read more info about Appointment Business Card Printing So please always share this kind of information. Thanks.
ReplyDeleteI found decent information in your article. I am impressed with how nicely you described this subject, It is a gainful article for us. Thanks for share it.Buy Kids Education Infographics in USA
ReplyDeleteGreat tutorial... Thanks a lot :) packaging designer
ReplyDelete