This part of this coloring tutorial describes how to use Photoshop vector solid and gradient layers to fill up complex shapes. Here in this tutorial we will see how we can use clipping masks and clip paths to limit the fills to it's base shapes.
Read the other parts of this tutorial here

At first I have added one gradient layer under the set tiger_skin and adjusted its settings to get a tint matching original but dramatized tiger skin. I renamed it as skin. Then I made two copies of it pressing command+j / ctrl +j and renamed them as dark and light.
I set the blend mode of dark to multiply and adjusted the gradient settings to a slightly lighter one so that when combined yields a nice dark shade. Similarly I set the blend mode of the light to screen and made its gradient settings to slight darker.
At last these two layers are grouped with previous holding alt and clicking between layers so that when clipped they will not spill out of the base skin area.

After adding these layer our image is like this. The brown gradient is actually a combination of three layers. now we will have to clip these layers to ge the shape of the tiger skin as demarked by the ink.

Using path tool first I made the shape of the skin base. Then the vector masks of the dark and light tints were made.
As we had done earlier with the mahadeva layer, here too I have cheated a lot drawing the clipping paths of dark and light layers, because finally they will be cropped out at the edge as they are grouped with previous layer. The result of the clipping of the tiger skin layers made a out put like this.
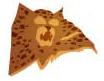
And combined with ink, it is somewhat like this.

Read the previous part Coloring the character or continue reading Adding shadows and highlights
Read the other parts of this tutorial here
Part 1 : Creating a workspace
Part 2: Coloring the character
Part 3 : Coloring accessories
Part 4 : Adding shadows and highlights
Part 5 : Painting the drappery
Part 6: Creating a background
Part 7 : Adding effects
Part 8 : Creating the blurb
At first I have added one gradient layer under the set tiger_skin and adjusted its settings to get a tint matching original but dramatized tiger skin. I renamed it as skin. Then I made two copies of it pressing command+j / ctrl +j and renamed them as dark and light.
I set the blend mode of dark to multiply and adjusted the gradient settings to a slightly lighter one so that when combined yields a nice dark shade. Similarly I set the blend mode of the light to screen and made its gradient settings to slight darker.
At last these two layers are grouped with previous holding alt and clicking between layers so that when clipped they will not spill out of the base skin area.
After adding these layer our image is like this. The brown gradient is actually a combination of three layers. now we will have to clip these layers to ge the shape of the tiger skin as demarked by the ink.
Using path tool first I made the shape of the skin base. Then the vector masks of the dark and light tints were made.
As we had done earlier with the mahadeva layer, here too I have cheated a lot drawing the clipping paths of dark and light layers, because finally they will be cropped out at the edge as they are grouped with previous layer. The result of the clipping of the tiger skin layers made a out put like this.
And combined with ink, it is somewhat like this.
Read the previous part Coloring the character or continue reading Adding shadows and highlights
Comments
Post a Comment