What is Photoshop Vector? In Photoshop you can use solid and gradient layers and add clip paths to them to create scalable, resizable and easily editable graphics. In this short tutorial series, I have tried to show my workflow for using psd vectors to color a simple comics book cover. Part 1 of this series shows how to setup a perfect workspace for coloring using photoshop vector.
Table of index of this series of tutorial
I had made this drawing on a piece of paper using pencil and then scanned the picture to a 600 dpi b/w tiff, and after that it was down sampled to 300 dpi image in 'bi-cubic sharper'.
The first thing I did when this image was opened inside Photoshop, was to made the color mode of the document to CMYK
Finally adjusting the brightness/contrast and curves I made it proper black and white. Additional inking was done using pen tool - convert the paths to selection and filling them with solid black.
The background layer was double-clicked to make it a simple layer, renamed it as ink and made its blend-mode to multiply. This layer will be placed on top of the layer stack to maintain the inking. This is how the layer stack looks like now.
I had created 5 layer sets to hold the various solid and gradient layers which will be needed to color the image.
Note that the blurb layer is put atop ink, the content of the blurb may spread over the whole image for a pro look.
Behind the character I have added two more layer namely fx and bg so that I can add some additional effects may it be related to the character or to the background. I don't want the content of these elements to be jumbled up, that's why these two sets are there.
mahadev is the name of the character and tiger_skin is his dress. as the tiger skin has too many elements namely the spots, the different shades of the skin and mouths etc., that's why with this set I can manage the contents of this element.
Read the second part of this tutorial to learn how to color the character
Table of index of this series of tutorial
Part 1 : Creating a workspace
Part 2: Coloring the character
Part 3 : Coloring accessories
Part 4 : Adding shadows and highlights
Part 5 : Painting the drappery
Part 6: Creating a background
Part 7 : Adding effects
Part 8 : Creating the blurb
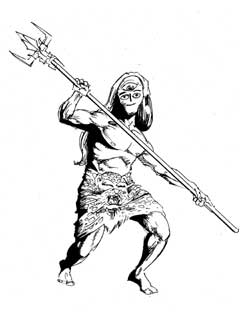
I had made this drawing on a piece of paper using pencil and then scanned the picture to a 600 dpi b/w tiff, and after that it was down sampled to 300 dpi image in 'bi-cubic sharper'.
The first thing I did when this image was opened inside Photoshop, was to made the color mode of the document to CMYK
Finally adjusting the brightness/contrast and curves I made it proper black and white. Additional inking was done using pen tool - convert the paths to selection and filling them with solid black.
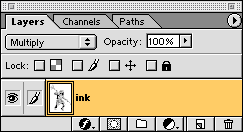
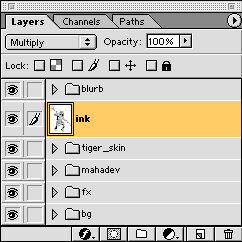
The background layer was double-clicked to make it a simple layer, renamed it as ink and made its blend-mode to multiply. This layer will be placed on top of the layer stack to maintain the inking. This is how the layer stack looks like now.
I had created 5 layer sets to hold the various solid and gradient layers which will be needed to color the image.
Note that the blurb layer is put atop ink, the content of the blurb may spread over the whole image for a pro look.
Behind the character I have added two more layer namely fx and bg so that I can add some additional effects may it be related to the character or to the background. I don't want the content of these elements to be jumbled up, that's why these two sets are there.
mahadev is the name of the character and tiger_skin is his dress. as the tiger skin has too many elements namely the spots, the different shades of the skin and mouths etc., that's why with this set I can manage the contents of this element.
Read the second part of this tutorial to learn how to color the character
Comments
Post a Comment