This is the fourth part of the coloring tutorial in Photoshop with solid and gradient layers. The purpose of using psd vector is to maintain editability of the elements in this image. In this part we will see how we will use layer masks applied to the clipped vector layers to reveal or hide specific parts of the shadow and highlight layers to create depth in the image.

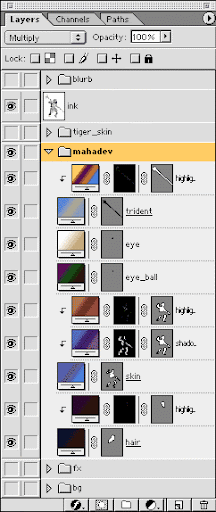
Inside mahadeva set, now I have to add many layers.
Some adjustments to the colors of the gradient layers is necessary so that the final combined tint for the shadow or the highlight looks nice.

When these layers are created their contents are actually spread over all the image. so to limit their effect I had clipped them accordingly.
Here too since the layers are grouped with the previous ones so I made some rough clippings just to make the boundaries.
When clipping is done, its time to add layer masks to the shadow and highlight layers to curve out the areas showing the optical effects.
I first added the layer masks and then inverted them to hide everything and after that using our old pen tool - path - convert path to selection - gradient tool - fill selection with gradient technique I draw the shadow and highlight effects.
Here is one thing to remember - while you are selecting one layer for your operation the vector mask is also selected. so never forget to deselect the layer clipping path by clicking on them. Otherwise you will end up either messing your vector mask or loosing it -ok?
Here are the different layer masks.

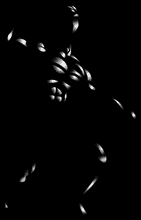
Finally the result is this.
This is the end of part 4 of this series of tutorial you can check back the previous part Coloring accessories or continue reading next part Painting the drapery
Part 1 : Creating a workspace
Part 2: Coloring the character
Part 3 : Coloring accessories
Part 4 : Adding shadows and highlights
Part 5 : Painting the drapery
Part 6: Creating a background
Part 7 : Adding effects
Part 8 : Creating the blurb

Inside mahadeva set, now I have to add many layers.
- I have added one gradient layer for the highlight of trident, there will be no shadow on it,since I want it to be shown very shiny. I set the blend mode of this layer to screen.
- The shadow and highlight of the eye and eyeball have been managed on its color layers, so now we don't have to be bothered about it.
- I added two layers for the shadow and the highlight of the skin and set the blend mode of the shadow layer to multiply and the blend mode of the highlight layer to screen as per our rule.
- Lastly one layer is added for the highlight of the hair. On the hair the shadow has been managed in the ink layer, so we will not add any additional shadow to it to avoid untidiness.
Some adjustments to the colors of the gradient layers is necessary so that the final combined tint for the shadow or the highlight looks nice.

When these layers are created their contents are actually spread over all the image. so to limit their effect I had clipped them accordingly.
Here too since the layers are grouped with the previous ones so I made some rough clippings just to make the boundaries.

When clipping is done, its time to add layer masks to the shadow and highlight layers to curve out the areas showing the optical effects.
I first added the layer masks and then inverted them to hide everything and after that using our old pen tool - path - convert path to selection - gradient tool - fill selection with gradient technique I draw the shadow and highlight effects.
Here is one thing to remember - while you are selecting one layer for your operation the vector mask is also selected. so never forget to deselect the layer clipping path by clicking on them. Otherwise you will end up either messing your vector mask or loosing it -ok?
Here are the different layer masks.
 |  |
| hair highlight | trident highlight |
 |  |
| skin shadow | skin highlight |

Finally the result is this.
This is the end of part 4 of this series of tutorial you can check back the previous part Coloring accessories or continue reading next part Painting the drapery
Comments
Post a Comment