This is claver to use solid and gradient layers and Photoshop clipping paths to create scalable and customizable Photoshop graphics. This is a small tutorial to demonstrate my workflow in Photoshop.

Double click on the single Background layer in the layer stack and rename it as ref. Set its blend mode to multiply and set its opacity value to 50%. This layer will be our reference layer for tracing up and hence to render our final image.
Rename this layer as base. Add a vector clipping path to this layer and using the pen tool start tracing along the boundary of the entire box.
Add three more gradient layers above the base layer, and rename them as lock, right and left.
Set the blend mode of the left layer to color burn, and add a vector clipping path to cover up the left side of the box.
Set the blend mode of the right layer to color burn, and add a vector clipping path to cover up the right of inside the box.
Set the blend mode of the lock layer to color burn, and add a vector clipping path to cover up the lock portion of the box.

Add two more gradient layers above the lastly created lock shadow layer, and rename them as front and lid.
Set the blend mode of the front layer to color dodge, and add a vector clipping path to cover up the left side of the box.
Set the blend mode of the lid layer to color dodge, and add a vector clipping path to cover up the left side of the box.
Reuse paths again...
Copy any necessary segment of the base path and add / delete points for the clipping path of the other layers.

Turn off the ref layer and watch your result - it is 3d. It is always better to organize your layer structure, so select all the layers from front to base and group them. Rename this layer group as box.
When our box is done we need to place it on some background. Create a new layer group beneath box layer and rename this as bg. Our background elements will be placed inside this layer group.
Rename this layer as base.
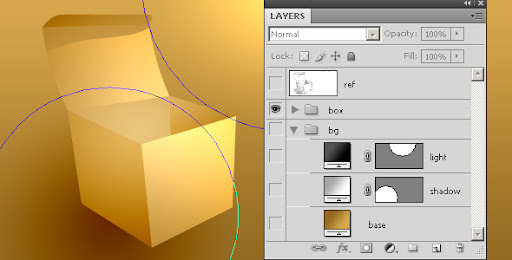
Source of light of our composition is on top right, and the resultant shadow should be placed bottom left of the box. Add two new gradient layer under bg layer-group above the base layer. Rename them as light and shadow. The settings for these layers are as follows:
Set the blend mode of this layer to color dodge. Using Ellipse tool add a circular vector mask on this layer at top-right position of the box as shown in the image
Set the blend mode of this layer to color burn. Using Ellipse tool add a circular vector mask on this layer at bottom-left position of the box as shown in the image

This is the end result.
So now you have a full-scalable and customizable psd-vector 3d box. Drag and drop the box layer to your own graphics or place other graphics to this composition - scale it, tweak the gradient layers and experiment with your design!
Just changing the base gradient layer of the box you can achieve the box of color of your choice. Play with it.
you can Download the PSD here to see the actual anatomy of thedemonstratedfile.

Step 1: The concept sketch
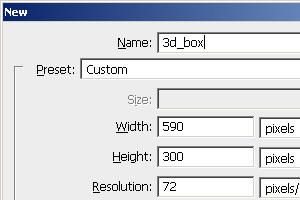 | It is always best to start your work with some concept sketch or references, so here we will startthis tutorial with a simple rough sketch of our idea. Open Photoshop & create a new document. For this tutorial we will take a 590px wide & 300px high document with other settings unaltered. additionally i have set the name of the document as 3d_box. After that using a 2 or 3 px brush and with some dark foreground color, we will draw our concept about the 3d box in perspective. In this phase a drawing tablet may come handy, but i have managed it with mouse. Note that you don't have to be precise about the lines or all other things as we are going to render our final image in vector and you will have greater flexibility to change / correct anything at any time. |
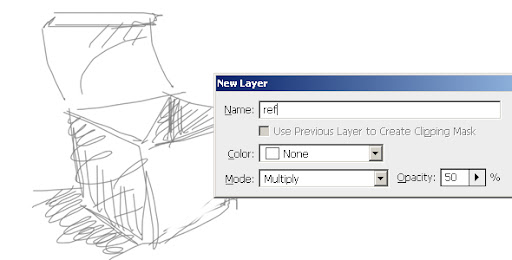
Step 2: Setting The reference layer

Double click on the single Background layer in the layer stack and rename it as ref. Set its blend mode to multiply and set its opacity value to 50%. This layer will be our reference layer for tracing up and hence to render our final image.
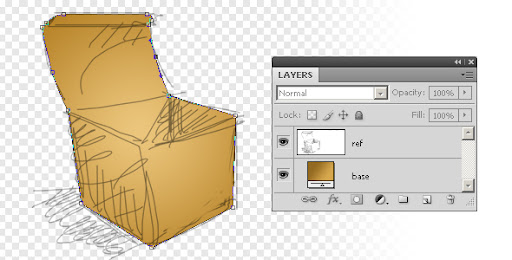
Step 3: Tracing the box

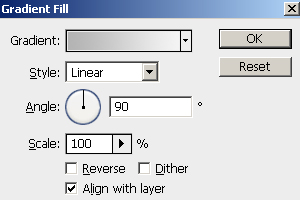
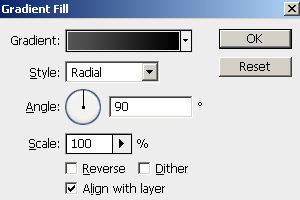
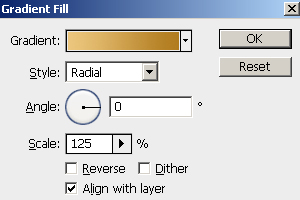 | Under the ref layer, add a gradient layer with the following settings :
|
Rename this layer as base. Add a vector clipping path to this layer and using the pen tool start tracing along the boundary of the entire box.
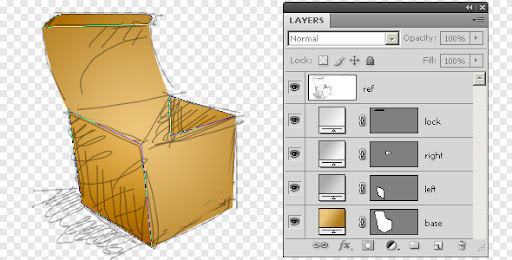
Step 4: Adding shadows to the box

Add three more gradient layers above the base layer, and rename them as lock, right and left.
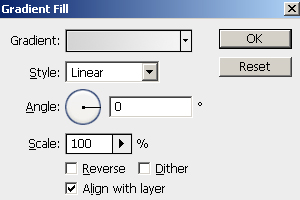
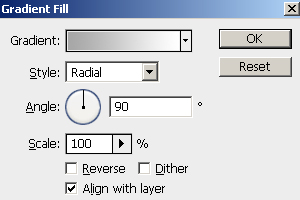
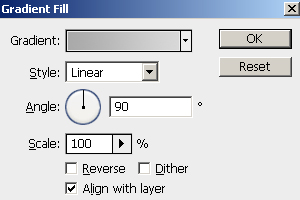 | Settings for the left gradient layer is as follows :
|
Set the blend mode of the left layer to color burn, and add a vector clipping path to cover up the left side of the box.
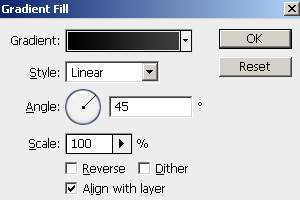
 | Settings for the right gradient layer is as follows :
|
Set the blend mode of the right layer to color burn, and add a vector clipping path to cover up the right of inside the box.
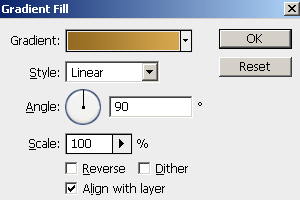
 | Settings for the lock gradient layer is as follows :
|
Set the blend mode of the lock layer to color burn, and add a vector clipping path to cover up the lock portion of the box.
Reuse path from 'base' layerYou already have traced the entire box outline - right? Copy any necessary segment of the base path and add / delete points for the clipping path of the other layers.
Step 5: Adding highlights to the box

Add two more gradient layers above the lastly created lock shadow layer, and rename them as front and lid.
 | Settings for the front gradient layer is as follows :
|
Set the blend mode of the front layer to color dodge, and add a vector clipping path to cover up the left side of the box.
 | Settings for the lid gradient layer is as follows :
|
Set the blend mode of the lid layer to color dodge, and add a vector clipping path to cover up the left side of the box.
Copy any necessary segment of the base path and add / delete points for the clipping path of the other layers.
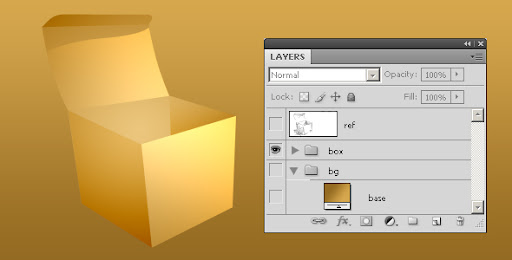
Step 6: Its 3d now...

Turn off the ref layer and watch your result - it is 3d. It is always better to organize your layer structure, so select all the layers from front to base and group them. Rename this layer group as box.
Step 7: Background

When our box is done we need to place it on some background. Create a new layer group beneath box layer and rename this as bg. Our background elements will be placed inside this layer group.
 | Add a new gradient layer with the settings as follows :
|
Rename this layer as base.
Step 8: Source of light and drop shadow

Source of light of our composition is on top right, and the resultant shadow should be placed bottom left of the box. Add two new gradient layer under bg layer-group above the base layer. Rename them as light and shadow. The settings for these layers are as follows:
 | Settings for the light layer :
|
Set the blend mode of this layer to color dodge. Using Ellipse tool add a circular vector mask on this layer at top-right position of the box as shown in the image
 | And the settings for shadow layer is:
|
Set the blend mode of this layer to color burn. Using Ellipse tool add a circular vector mask on this layer at bottom-left position of the box as shown in the image
Step 9: Done

This is the end result.
So now you have a full-scalable and customizable psd-vector 3d box. Drag and drop the box layer to your own graphics or place other graphics to this composition - scale it, tweak the gradient layers and experiment with your design!
Step 10: Play with the graphics
Just changing the base gradient layer of the box you can achieve the box of color of your choice. Play with it.
you can Download the PSD here to see the actual anatomy of thedemonstratedfile.
Comments
Post a Comment